Hey friends! How is everyone holding up in quarantine land?
Not gonna lie, today isn’t a good day for me. The kids have built a fort outside with every blanket in the house (aka- there is 5 more loads of laundry for me), tons of scrap wood from the garage, most of the outdoor furniture, and the last piece of my sanity is out there somewhere. I love their creative side but it makes for so much work for me…. Tons more is happening here, but let’s be real-you are here for the DIY, not the pity party…..So let’s skip to the good stuff (Just say a few prayers for us over here in the meantime, OK?)
Soooooo…..THIS is the ultimate goal.

It’s so simple! Let’s start with the tools needed:
- Wood pieces for frame
- twine
- staple gun/staples
- pictures of your choice
- stain/old rag to stain with
Simple enough right? Ok-here are the steps!
1. Cut your wood.

This is a step you can skip if you can get your wood cut at Lowe’s or Home Depot *that’s why I didn’t include the saw in the tools needed* We used some old boards laying around our garage, so this was free for us!
You need wood that is 25-26 inches long depending on how much overhang you prefer on your pictures! We chose 26 inches.
2. Stain your wood pieces
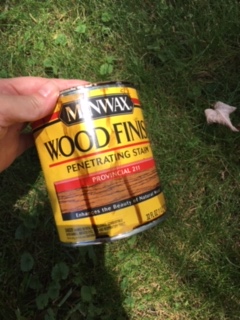
Listen, I would stain every wood surface in this house if I could. I love stain, and my favorite method to stain is just to dip an old rag right into to the can. I rub a light coat on the wood and let it dry. BOOM. done. *This is my absolute favorite color stain and i use it on EVERYTHING!*
*Pro tip- If you put too much stain on the wood at once, it won’t dry! It will stay tacky and you will have to sand it down and start over. NOT FUN. Make sure you are doing light coats, and if you want it darker, let it dry completely and do another coat! I promise it’s worth the wait!
3. Staple your pictures on
Yall I’m an eye-baller. AKA-I don’t measure anything. And let me just toot my horn-I’m pretty good at my projects looking decent-toot toot. Ok done.
Now place your wood upside down and place your picture on the wood-staple when it’s centered (Eye-ball it or measure, whatever floats your boat) staple it down! I gave mine 6 staples per piece of wood-3 towards the top of the wood, 3 towards the bottom. This will keep your poster from flopping! Repeat at the bottom and VOILA! You have a frame!
4. Staple your twine
Measure your first piece of twine to your liking, then cut 2 more pieces just like it. Staple them on to each side of your wood ( I stapled twice on each side for security) and you are DONE! Hang those babies on the wall and admire your custom artwork for less than 50 bucks! You can’t beat it.
Now for some picture details! I ordered these from Walgreens.* They were half off at the time, so if they aren’t on sale now, just wait! They will get cheaper!* We used the 24×36 poster and noticed our pictures had too much empty space up top, so we cut them down about 8-10 inches. (You will probably not have to cut yours down. Most pictures are centered so that will be one less step for you!
Here is the money breakdown:
- Wood-found in garage- FREE
- Stain-found in garage-FREE
- Twine-Home Depot-$5.00
- Staple gun-in my garage-FREE
- Poster Prints-Walgreens $45.00 (15.00 per photo)
$50.00 total for what would have cost me $150-300 bucks if I would have ordered from a print shop! To say I am thrilled is an understatement!
These prints turned out so beautifully and I can’t stop staring at my babies on the wall! I think we will use them to take a pic every year and see how they have grown and changed. What do you think?
Ok who is up next to try this DIY?? If you try it, make sure to send me pics! I can’t wait to see what you all create!
Talk again soon, and of course,
All the love yall

 So this teeeeeny little bottle is 50,000 beads (Or I am assuming. Hoping they didn’t lie to me.) And when I opened the package I was pretty disappointed…but see how much we used out of the tiny bottle? That gave us this many beads….
 That is a rubbermaid tub full of beads! It was sooo many and were barely used a few teaspoons of beads. Amazing! Callaway got in there and sat for probably an hour while the boys put legos, cars, ramps etc in there and they all had the time of their life! Totally worth the purchase and we can use these time and time again!


 (The owner told me I could steal the pics so don’t report me!) BUt i wanted you to see–they are normal people. Not meatheads that make you feel like an idiot. They don’t judge. They modify moves for those of us struggling.They do progressive moves for those more advanced-its awesome. I just feel super thankful that I found this awesome little community and if you need some motivation-try them out! Your first class is free-Just click